Adjustable rotary dampers, with built-in adjustability (such as the JPCN20A’s ±20% torque range) and performance optimization potential, these components let you fine-tune motion control to match your exact needs.
This guide breaks down step-by-step adjustment methods (using the JPCN20A as a real-world example) and key strategies to optimize durability and consistency, all grounded in the technical specifications of the JPCN20A.
Why Adjustable Rotary Dampers Matter
Unlike fixed-torque dampers, adjustable models give you flexibility to:
-
Compensate for temperature changes (which alter damping fluid viscosity).
-
Fix minor performance drift over time (without replacing the entire damper).
-
Meet specific closing time requirements (critical for safety and user experience).
The JPCN20A exemplifies this flexibility: its rotating shaft has an adjusting screw that lets you tweak torque by ±20%, while its design supports closing time targets (11±4 seconds for standard testing, ≥3 seconds after durability cycles)—making it ideal for applications like automotive storage lids or heavy-duty cabinet doors.
Step-by-Step Adjustment for the JPCN20A (and Similar Models)
Adjusting an adjustable rotary damper isn’t guesswork—it requires following the damper’s technical specs to avoid over-torquing or damaging components. Below is a hands-on guide tailored to the JPCN20A:
1. Prepare Tools and Pre-Adjustment Testing
Before adjusting, confirm you have the right tools and baseline data:
-
Tools: Small flathead screwdriver (for the JPCN20A’s adjusting screw) and a stopwatch (to measure closing time).
-
Pre-test: First, verify the current performance of the JPCN20A using its standard test method:
-
Open the damper’s attached component (e.g., a lid) to 110°.
-
Start timing when the component closes to 70°, and stop when it reaches 0°.
-
Record the closing time—for the JPCN20A, the target is 11±4 seconds (new or well-maintained units).
-
Note if the time is too fast (damper too weak) or too slow (damper too stiff)—this tells you which direction to adjust.
Pro Tip: The JPCN20A’s lid opening force should stay <15N after adjustment—test this with a force gauge if you’re working on user-facing components (e.g., car glove boxes).
2. Adjust Torque (Using the JPCN20A’s Screw)
The JPCN20A’s rotating shaft has a built-in adjusting screw—this is your key to modifying torque. Follow these rules to avoid damage:
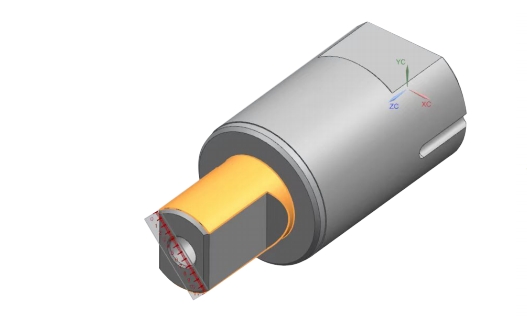
Location of the JPCN20A’s torque-adjusting screw (on the rotating shaft)
-
Adjustment Direction:
-
If closing time is too fast (needs more damping force): Turn the screw clockwise (CW) in small increments (1/8 turn at a time).
-
If closing time is too slow (needs less damping force): Turn the screw counterclockwise (CCW) in small increments.
-
-
Torque Limit: Never exceed the JPCN20A’s ±20% torque range (its base torque is 1–4.5N·m, so max adjustment is 0.8–5.4N·m). Over-adjusting can strip the screw or damage the damper’s internal piston.
-
Post-Adjustment Check: After each 1/8 turn, re-test the closing time (70° to 0°) with the stopwatch. Repeat until the time falls within 11±4 seconds (or your application’s specific target).
Example: If the JPCN20A’s initial closing time is 6 seconds (too fast), a 1/4 clockwise turn might increase torque just enough to slow it to 10 seconds—within the target range.
3. Validate Adjustment with Durability Checks
Adjusting torque isn’t enough—you need to ensure the JPCN20A maintains performance after use. The JPCN20A has two critical durability tests to reference:
-
Free Fall Durability: After 30,000 cycles (open 0°→110° in 2 seconds, close to 70°, then free fall to 0°), let the damper sit at room temperature for 24 hours. Re-test closing time—it must stay ≥3 seconds.
-
Forced Durability: After 10,000 cycles (110°→0° in <4 seconds), the closing time must also be ≥3 seconds.
If the JPCN20A fails these tests after adjustment, you may have over-torqued it—reverse the screw by 1/16 turn and re-test.
How to Optimize Adjustable Rotary Damper Performance
Adjustment is just the first step—optimization ensures the JPCN20A (or any adjustable damper) works reliably long-term. Focus on these four areas, all aligned with the JPCN20A’s specs:
1. Compensate for Temperature Changes
Temperature drastically affects the JPCN20A’s damping fluid (silicone-based):
-
At 80°C (176℉): Damping time is half of normal (damper feels weak).
-
At -20°C (-4℉): Damping time is twice normal (damper feels stiff).
Optimization Tips:
-
For high-temperature environments (e.g., near engine bays): Adjust the JPCN20A’s torque to the upper end of its ±20% range (e.g., from 3N·m to 3.6N·m) to compensate for fluid thinning.
-
For low-temperature environments (e.g., winter outdoor storage): Adjust torque to the lower end (e.g., from 3N·m to 2.4N·m) to reduce stiffness, or pre-warm the component (e.g., park a vehicle in a garage) before use.
-
Stay within the JPCN20A’s recommended operating temperature (0°C–60°C/32℉–140℉) whenever possible—exceeding this shortens fluid life.
2. Control Usage Frequency
The JPCN20A has a maximum usage frequency of 3 cycles per minute (1 cycle = 110° forward rotation + 110° reverse rotation). Exceeding this:
-
Overheats the damping fluid (reducing viscosity).
-
Wears down internal seals faster.
Optimization Tips:
-
For high-use applications (e.g., factory equipment lids), add a 20-second pause between cycles to let the JPCN20A cool.
-
If you need faster cycles, verify with Peir (or the damper manufacturer) if a high-frequency model is available—don’t force the JPCN20A beyond its limits.
3. Maintain Seals and Cleanliness
The JPCN20A’s housing (PBT+GF) and shaft (PA+GF) are durable, but contaminants (dust, oil, road salt) can damage seals and disrupt adjustment:
-
Cleaning: Wipe the JPCN20A’s body and shaft with a dry cloth every 2–3 months. For automotive use (e.g., RV doors), rinse gently with water (avoid high-pressure washers) to remove salt.
-
Seal Inspection: Check the area around the adjusting screw for oil stains—leaks mean seals are worn, and torque adjustments won’t hold. Replace seals with genuine parts (matching the JPCN20A’s shaft diameter) to maintain performance.
4. Align Torque with Load Requirements
The JPCN20A’s torque (1–4.5N·m) is designed for specific loads—misaligning load and torque wastes its adjustability:
-
Light loads (e.g., 5kg lids): Use the lower end of the JPCN20A’s torque range (1–2N·m) to avoid stiff operation.
-
Heavy loads (e.g., 15kg lids): Use the upper end (3–4.5N·m) to ensure smooth closing.
-
Lift Assistance: The JPCN20A provides up to 50% torque as lift assistant force—calculate this based on your load (e.g., a 10kg lid needs \~100N of lift force; the JPCN20A can contribute \~50N if torque is set to 3N·m).
Common Adjustment Issues (and Fixes for the JPCN20A)
Even with careful adjustment, you may run into problems. Here’s how to troubleshoot:
| Issue | Possible Cause | Fix for JPCN20A |
|---|---|---|
| Closing time still too fast after max CW adjustment | Fluid leakage (lost viscosity) | Replace O-rings and refill with silicone oil (matching the JPCN20A’s original fluid specs). |
| Adjusting screw won’t turn | Screw is stripped or seized | Use a precision screwdriver (not a worn one) to avoid further damage; if seized, apply a drop of silicone lubricant (avoid petroleum-based oils). |
| Closing time drifts after 1,000 cycles | Fluid degradation from high temps | Adjust torque by +5% (small increment) and test; if drift continues, replace the damping fluid. |
Final Thought: Adjustability = Long-Term Value
Adjustable rotary dampers like the JPCN20A aren’t just “tunable”—they’re investments in long-term performance. By following the JPCN20A’s technical specs for adjustment, compensating for temperature and frequency, and maintaining cleanliness, you can extend its lifespan (well beyond its 30,000-cycle durability rating) and keep it aligned with your application’s needs.
For more details on the JPCN20A’s specs (e.g., exploded views, material compatibility) or to source genuine replacement parts, refer to the manufacturer’s documentation or contact with our technical support team.